Monthly Archives: 5月 2013

mod_security と ModSecurity_Core_Rule の導入

mod_securityをアップデートしたら色々とひどい目にあったのでメモしておきます。

リポジトリ”Atomic”が必要となるので事前に導入しておいてください。
新規インストールする人はmod_securityをインストールします
# yum –enablerepo=atomic install mod_security

アップデートの場合、古いModSecurity_Core_Rule(1系)を使用しているとid周りの書式が違うらしくエラーを吐きます
そのためにApacheを再起動する前に設定ファイルの文法エラーがないか必ず確認しておいてください
# service httpd configtest

ModSecurity_Core_Ruleをダウンロードして下さい
# wget https://github.com/SpiderLabs/owasp-modsecurity-crs/tarball/master
ダウンロードしたファイルを展開します
# tar zxvf master
ディレクトリ名を変更します
# mv SpiderLabs-owasp-modsecurity-crs-9a715d8 modsecurity.d

念のためApacheの設定ファイル関連を一式バックアップします。
# cp /etc/httpd /etc/httpd_backup

ModSecurity_Core_Ruleをインストールします
# mv modsecurity.d /etc/httpd/
設定ファイルのテンプレートをコピーします
# cp /etc/httpd/modsecurity.d/modsecurity_crs_10_setup.conf.example\
/etc/httpd/modsecurity.d/modsecurity_crs_10_config.conf

ModSecurity_Core_Ruleを設定します
# vi /etc/httpd/modsecurity.d/modsecurity_crs_10_config.conf
下記の項目を設定します。項目がない場合は自分で記述します。

SecAuditEngine RelevantOnly
SecRuleEngine On

SecAuditLogType Serial
SecAuditLog logs/audit_log

#SecDefaultAction "phase:1,deny,log"
SecDefaultAction "phase:2,log,deny,status:406"

mod_securityの設定を確認します
# vi /etc/httpd/conf.d/00_mod_security.conf
多分、デフォルトでは下記の様になっているとおもいます。

# ASL mod_security Template: /var/asl/data/templates/template-00_mod_security.conf
#
LoadModule security2_module modules/mod_security2.so
LoadModule unique_id_module modules/mod_unique_id.so
#
<IfModule mod_security2.c>
        # Basic configuration goes in here
        Include modsecurity.d/tortix_waf.conf

        # Rule management is handled by ASL
        Include modsecurity.d/00*exclude.conf
        Include modsecurity.d/*asl*.conf
        Include modsecurity.d/99*exclude.conf

</IfModule>

これを下記のように書き換えます。
※ Include modsecurity.d/base_rules/*.conf の部分は各自の用途に合わせて設定してください。ちなみに全部読むと多分エライことになると思います。

# Debug Log.
SecDebugLog logs/modsec_debug_log
SecDebugLogLevel 1

# Log File.
#SecAuditEngine On
#SecAuditEngine RelevantOnly
#SecAuditLog logs/mod_security_audit_log
#SecAuditLogType Serial
LogFormat "%V %h %t %{UNIQUE_ID}e \"%r\" %>s %X | %I %O | %<{mod_security-time1}n %<{mod_security-time2}n %<{mod_security-time3}n %D" mperformance
CustomLog logs/modsec_performance_log mperformance

# ASL mod_security Template: /var/asl/data/templates/template-00_mod_security.conf
#
LoadModule security2_module modules/mod_security2.so
LoadModule unique_id_module modules/mod_unique_id.so
#
<IfModule mod_security2.c>
        # Basic configuration goes in here
        #Include modsecurity.d/tortix_waf.conf
        Include modsecurity.d/modsecurity_crs_10_config.conf

        Include modsecurity.d/base_rules/*.conf

        # Rule management is handled by ASL
        Include modsecurity.d/00*exclude.conf
        Include modsecurity.d/*asl*.conf
        Include modsecurity.d/99*exclude.conf

</IfModule>

なお、2バイト文字を含むデータを渡すと”modsecurity_crs_40_generic_attacks.conf”内に定義されている”Heuristic Checks”の”Repeatative Non-Word Chars”に引っかり406エラーを返すため下記のようにコメントアウトします。
# vi /etc/httpd/modsecurity.d/base_rules/modsecurity_crs_40_generic_attacks.conf

#
# -=[ Heuristic Checks ]=-
#
# [ Repeatative Non-Word Chars ]
#
# This rule attempts to identify when multiple (4 or more) non-word characters are repeated in sequence
#
#SecRule ARGS "\W{4,}" "phase:2,capture,t:none,t:urlDecodeUni,block,id:'960024',rev:'2',ver:'OWASP_CRS/2.2.7',maturity:'9',accuracy:'8',msg:'Meta-Character Anomaly Detection Alert - Repetative Non-Word Characters',logdata:'Matched Data: %{TX.0} found within %{MATCHED_VAR_NAME}: %{MATCHED_VAR}',setvar:tx.anomaly_score=+%{tx.warning_anomaly_score},setvar:'tx.msg=%{rule.msg}',setvar:tx.%{rule.id}-OWASP_CRS/WEB_ATTACK/COMMAND_INJECTION-%{matched_var_name}=%{tx.0}"

これまでの設定の文法が正しいか確認します
# service httpd configtest
問題がなければmod_securityを有効化するためApacheを再起動します
# service httpd restart

下記のようなURLへアクセスするとこで406エラーが出れ正常に動作している事が確認できます。
ディレクトリトラバーサル攻撃
http://サーバのURL/index.html?q=/etc/passwd
ヌルバイト攻撃
http://サーバのURL/index.html?q=./%00
OSコマンドインジェクション攻撃
http://サーバのURL/index.html?p=|traceroute
SQLコマンドインジェクション攻撃
http://サーバのURL/index.html?p=2%20order%20by%201
クロスサイトスクリプティング攻撃
http://サーバのURL/index.html?q=<script>alert(0)</script>
CentOS5 アップデートしたらliblua-5.1.soが行方不明になった 対策

アップデートを行ったところ下記のようなエラーが出るようになったため対策方法を探した。

mod_security-2.7.4-15.el5.art.x86_64 from atomic has depsolving problems
  --> Missing Dependency: liblua-5.1.so()(64bit) is needed by package mod_security-2.7.4-15.el5.art.x86_64 (atomic)
Error: Missing Dependency: liblua-5.1.so()(64bit) is needed by package mod_security-2.7.4-15.el5.art.x86_64 (atomic)
 You could try using --skip-broken to work around the problem
 You could try running: package-cleanup --problems
                        package-cleanup --dupes
                        rpm -Va --nofiles --nodigest

どうもlua-5.1.4-1ではliblua-5.1.soが入っていないようなので
直接liblua-5.1.soが入っている新しいrpmパッケージをダウンロードしてアップデートする。
# wget http://dl.fedoraproject.org/pub/epel/5/x86_64/lua-5.1.4-4.el5.x86_64.rpm
# rpm -U lua-5.1.4-4.el5.x86_64.rpm

ちゃんと存在するか確認する
# rpm -ql lua | grep .so
/usr/lib64/liblua-5.1.so

全体のアップデートを行う
# yum update

ESXi5.1 APC Smart UPS 連携 メモ

前回のアップデートESXi5.1を623860から914609へアップデートするにより、”vmware-autohalt.sh”を使用しなくてもゲストOSを自動でシャットダウンできるようになったため連携の仕方が若干変わった。

USP連携についてはあまり触れているところは少ないため大まかながらメモしておく。

無料版ESXi5.1のホスト方ではUSP連携に対応していないためゲストを利用してUPSと連携する。
※ 方法は色々あるようで”VMware vSphere Management Assistant”と呼ばれる物を導入する方法もあるようだが今回はゲストにCentOS5を使用して実現する。

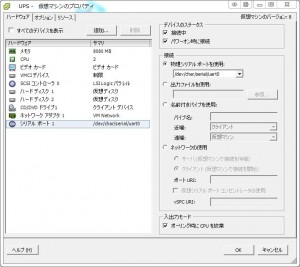
使用するゲストにシリアルポートを認識させる。
WS000043

ゲストにApcupsdをインストールする。
インストールの方法は色々と紹介されているので他サイトを参照。

シリアルポートのディバイスファイルの設定が正しいか確認する。
# cat /etc/apcupsd/apcupsd.conf | grep “DEVICE”

# You must also specify a DEVICE, sometimes referred to as a port.
# For USB UPSes, please leave the DEVICE directive blank. For
# UPSTYPE   DEVICE           Description
# usb       <BLANK>          Most new UPSes are USB. A blank DEVICE
DEVICE /dev/ttyS0

Apcupsdを起動する。
# service apcupsd start

ゲスト側でUPSが認識されているか確認するために下記のコマンドを実行する。
# apcaccess

APC      : 001,051,1246
DATE     : 2013-05-28 13:06:07 +0900
HOSTNAME : UPS-SERVER
VERSION  : 3.14.10 (13 September 2011) redhat
UPSNAME  : UPS_IDEN
CABLE    : Custom Cable Smart
DRIVER   : APC Smart UPS (any)
UPSMODE  : Stand Alone
STARTTIME: 2013-05-28 12:33:37 +0900
MODEL    : SMART-UPS 1000
STATUS   : ONLINE
LINEV    : 101.4 Volts
LOADPCT  :  15.6 Percent Load Capacity
BCHARGE  : 100.0 Percent
TIMELEFT :  93.0 Minutes
MBATTCHG : 30 Percent
MINTIMEL : 10 Minutes
MAXTIME  : 1200 Seconds
MAXLINEV : 102.0 Volts
MINLINEV : 099.4 Volts
OUTPUTV  : 101.4 Volts
SENSE    : High
DWAKE    : 000 Seconds
DSHUTD   : 180 Seconds
DLOWBATT : 02 Minutes
LOTRANS  : 090.0 Volts
HITRANS  : 110.0 Volts
RETPCT   : 000.0 Percent
ITEMP    : 40.0 C Internal
ALARMDEL : 5 seconds
BATTV    : 28.3 Volts
LINEFREQ : 50.0 Hz
LASTXFER : Line voltage notch or spike
NUMXFERS : 0
TONBATT  : 0 seconds
CUMONBATT: 0 seconds
XOFFBATT : N/A
SELFTEST : NO
STESTI   : 336
STATFLAG : 0x07000008 Status Flag
DIPSW    : 0x00 Dip Switch
REG1     : 0x00 Register 1
REG2     : 0x00 Register 2
REG3     : 0x00 Register 3
MANDATE  : 02/04/99
SERIALNO : WS9906012897
BATTDATE : 02/04/99
NOMOUTV  : 100 Volts
NOMBATTV :  24.0 Volts
EXTBATTS : 0
FIRMWARE : 60.12S.A
END APC  : 2013-05-28 13:06:46 +0900

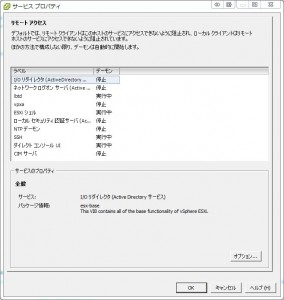
ESi5.1ホストマシンでシェルの使用とSSHでの接続を有効にする。
WS000044

※これらを有効にするとサマリで警告が表示されるが特に問題は無いので気にしない。

SSHを鍵を使い、パスワードなしでログインできるようにする。
SSHの鍵作成については過去記事ESXi5 SSH 公開鍵暗号化方式 作製を参照。

ゲストに秘密鍵を下記のパスになるようにコピーする。
/root/.ssh/esxi_id_rsa.pub

ESXi5.1ホストマシンに鍵を使ったSSHでパスワードなしでログインできることを確認する。
# ssh -i /root/.ssh/esxi_id_rsa.pub root@<ESXi5.1ホストマシンのIPアドレス>

ゲストでESXi5.1ホストマシンをシャットダウンするシェルスクリプトを作成する。
# vi /usr/local/bin/esxi_shutdown.sh

#!/bin/sh
ssh -i /root/.ssh/esxi_id_rsa.pub root@<ESXi5.1ホストマシンのIPアドレス> "/bin/halt"

実行権を与える。
# chmod 700 /usr/local/bin/esxi_shutdown.sh

実際に実行してESXi5.1ホストマシンがゲストからシャットダウンできるか確認する。
# /usr/local/bin/esxi_shutdown.sh

Apcupsdがシャットダウン時に実行するコマンドを書き換える
# vi /etc/apcupsd/apccontrol

#SHUTDOWN=/sbin/shutdown
SHUTDOWN=/root/bin/esxi_shutdown.sh

Apcupsdを再起動する。
# service apcupsd restart

最後にUPSの電源を引きぬいてESXi5.1ホストマシンが自動でシャットダウンされるか確認する。

参考サイト
ESXi 4.1 から ESXi 5.0 へアップグレード | SS-NET サポート
VMware ESXi 5.0 + vMA 5.0で電源管理 (3) – apcupsdの導入 « RootLinks Co., Ltd.
自宅サーバ構築じぶんめも SSH設定編 | ken39rajima

Raspberry Pi 自分の用途に合わせたディスクイメージを作成する Debian 最小構成

RaspbianはRaspberry Piに適した素晴らしいLinuxですがGUIが不要な用途だったりすると
不要なパッケージがあまりにも多く含まれていると感じたり
ほかのデスクトップ環境のディスクイメージを作りたいと考える人もいるかと思います
そこで、自分の用途に合わせたディスクイメージの作り方をメモしておきます

必要な物
・Raspberry Pi
・Raspbianの入ったSDカード
・空のSDカード
・カードリーダライタ

Raspbianの入ったSDカードで起動し
空のSDカードにディスクイメージとなる環境を作ります

SDのパーティション削除とジオメトリの設定
$ sudo fdisk /dev/sda

Command (m for help): p

Disk /dev/sda: 1990 MB, 1990197248 bytes
241 heads, 63 sectors/track, 256 cylinders, total 3887104 sectors
Units = sectors of 1 * 512 = 512 bytes
Sector size (logical/physical): 512 bytes / 512 bytes
I/O size (minimum/optimal): 512 bytes / 512 bytes
Disk identifier: 0x00000000

   Device Boot      Start         End      Blocks   Id  System
/dev/sda1   *          63     3886847     1943392+   b  W95 FAT32

Command (m for help): d
Selected partition 1

Command (m for help): x

Expert command (m for help): h
Number of heads (1-256, default 241): 255

Expert command (m for help): s
Number of sectors (1-63, default 63): 63

Expert command (m for help): c
Number of cylinders (1-1048576, default 256): 各自計算したシリンダ数

Expert command (m for help): r

Command (m for help): p

Disk /dev/sda: 1990 MB, 1990197248 bytes
255 heads, 63 sectors/track, 241 cylinders, total 3887104 sectors
Units = sectors of 1 * 512 = 512 bytes
Sector size (logical/physical): 512 bytes / 512 bytes
I/O size (minimum/optimal): 512 bytes / 512 bytes
Disk identifier: 0x00000000

   Device Boot      Start         End      Blocks   Id  System

Command (m for help): w
The partition table has been altered!

Calling ioctl() to re-read partition table.
Syncing disks.

シリンダ数の計算
SDカードの容量 / 255 / 63 / 512 = シリンダ数
例) 1990197248 / 255 / 63 / 512 = 241
割り切れない数値は切り捨てます

Windowsパーティション’/boot’の作成 (64MB)
$ sudo fdisk /dev/sda

Command (m for help): n
Partition type:
   p   primary (0 primary, 0 extended, 4 free)
   e   extended
Select (default p):
Using default response p
Partition number (1-4, default 1):
Using default value 1
First sector (2048-3887103, default 2048):
Using default value 2048
Last sector, +sectors or +size{K,M,G} (2048-3887103, default 3887103): +64M

Command (m for help): t
Selected partition 1
Hex code (type L to list codes): c
Changed system type of partition 1 to c (W95 FAT32 (LBA))

Command (m for help): a
Partition number (1-4): 1

Command (m for help): p

Disk /dev/sda: 1990 MB, 1990197248 bytes
62 heads, 62 sectors/track, 1011 cylinders, total 3887104 sectors
Units = sectors of 1 * 512 = 512 bytes
Sector size (logical/physical): 512 bytes / 512 bytes
I/O size (minimum/optimal): 512 bytes / 512 bytes
Disk identifier: 0x00000000

   Device Boot      Start         End      Blocks   Id  System
/dev/sda1   *        2048      133119       65536    c  W95 FAT32 (LBA)

Command (m for help): w
The partition table has been altered!

Calling ioctl() to re-read partition table.

WARNING: If you have created or modified any DOS 6.x
partitions, please see the fdisk manual page for additional
information.
Syncing disks.

Linuxパーティション”/”の作成 (残りの容量全部)
$ sudo fdisk /dev/sda

Command (m for help): n
Partition type:
   p   primary (1 primary, 0 extended, 3 free)
   e   extended
Select (default p):
Using default response p
Partition number (1-4, default 2):
Using default value 2
First sector (133120-3887103, default 133120):
Using default value 133120
Last sector, +sectors or +size{K,M,G} (133120-3887103, default 3887103):
Using default value 3887103

Command (m for help): p

Disk /dev/sda: 1990 MB, 1990197248 bytes
40 heads, 6 sectors/track, 16196 cylinders, total 3887104 sectors
Units = sectors of 1 * 512 = 512 bytes
Sector size (logical/physical): 512 bytes / 512 bytes
I/O size (minimum/optimal): 512 bytes / 512 bytes
Disk identifier: 0x00000000

   Device Boot      Start         End      Blocks   Id  System
/dev/sda1   *        2048      133119       65536    c  W95 FAT32 (LBA)
/dev/sda2          133120     3887103     1876992   83  Linux

Command (m for help): w
The partition table has been altered!

Calling ioctl() to re-read partition table.
Syncing disks.

必要なパッケージのインストール
$ sudo apt-get install dosfstools debootstrap git-core ca-certificates

フォーマット
$ sudo mkfs -t vfat -v -c -F 32 /dev/sda1
$ sudo mke2fs -t ext4 /dev/sda2 -m 1

SDカードに作成したパーティション/を/mntにマウントしてdebootstrapを使いDebianをインストール
$ sudo mount -o defaults,noatime /dev/sda2 /mnt/
$ sudo debootstrap –exclude=ed,nano –foreign –arch armel wheezy /mnt http://ftp.jp.debian.org/debian

必要なファイルをコピー
$ sudo cp /etc/inittab /mnt/etc/inittab
$ sudo cp /etc/hosts /mnt/etc/hosts
$ sudo cp /etc/fstab /mnt/etc/fstab
$ sudo cp /etc/network/interfaces /mnt/etc/network/interfaces

rootユーザで/mntをchrootし疑似的にLinuxを触る
chrootするとsudoコマンドは使えないためrootユーザになっておく必要があります
作業中は一応、ヒストリーに履歴が残ってしまうようなので残らないようにしておきます
debootstrapを実行させるとマウントしていた/procがアンマウントされるようなので再度マウントします
$ sudo su –
# export HISTSIZE=0 HISTFILESIZE=0
# chroot /mnt
# mount -n /proc
# export PATH=/bin:/sbin:/usr/bin:/usr/sbin
# /debootstrap/debootstrap –second-stage –no-resolve-deps
# mount -n /proc

リポジトリの追加
これは標準のDevianのリポジトリを追加していますが面倒ならRaspbian側のファイルをコピーしても問題ありません
# vi /etc/apt/sources.list

# See sources.list(5) for more information, especialy
# Remember that you can only use http, ftp or file URIs
# CDROMs are managed through the apt-cdrom tool.
deb http://http.us.debian.org/debian stable main contrib non-free
deb http://non-us.debian.org/debian-non-US stable/non-US main contrib non-free
deb http://security.debian.org stable/updates main contrib non-free

# Uncomment if you want the apt-get source function to work
#deb-src http://http.us.debian.org/debian stable main contrib non-free
#deb-src http://non-us.debian.org/debian-non-US stable/non-US main contrib non-free

アップデートとアップグレードの実行とその他、各自必要なパッケージのインストール
ここで好きなパッケージをインストールしておくことで用途に合わせたディスクイメージを作成することができます
# apt-get update
# apt-get upgrade
# apt-get install console-common console-setup console-data console-tools \
keyboard-configuration locales ntpdate ntp lua5.1 vim ssh sudo syslog-ng usbutils

ユーザの作成とsudoグループへの追加
この時にpasswdコマンドを使用しrootユーザのパスワードを設定することもできます
# adduser pi
# gpasswd -a pi sudo

chrootでの作業とrootでの作業の終了
# exit
# exit

起動時にeth0を有効化させる設定
$ sudo vi /mnt/etc/network/interfaces

auto lo eth0

iface lo inet loopback
iface eth0 inet dhcp

allow-hotplug wlan0
iface wlan0 inet manual
wpa-roam /etc/wpa_supplicant/wpa_supplicant.conf
iface default inet dhcp

/bootとモジュールのコピー
$ sudo mount /dev/sda1 /mnt/boot
$ sudo cp -rp /boot/* /mnt/boot
$ sudo cp -rp /lib/modules/* /mnt/lib/modules

カーネルとモジュールのアップデート
$ sudo wget http://goo.gl/1BOfJ -O /usr/bin/rpi-update
$ sudo chmod +x /usr/bin/rpi-update
$ sudo ROOT_PATH=/mnt BOOT_PATH=/mnt/boot rpi-update

SDカードをアンマウント
$ sudo umount -l /mnt

シャットダウン
$ sudo shutdown -h now

SDカードを引き抜き、SDカードのイメージを作成すればオリジナルディスクイメージの完成です。
イメージ作成はWin32 Disk Imagerなどを使用すると簡単かもしれません

最後に作成したSDカードをRaspberry Piに接続し電源を入れ、正常に起動するするかを確認してみてください。

参考URL
覚書的な何か » Blog Archive » Raspberry PiでまっさらなDebianのインストール
Debian Linux for Raspberry Pi – GreenLeaf
Raspberry piにDebian squeezeをインストールする – もぐてっく
fdiskでフォーマットする – Android on Beagle

Bashで文字と数字を足してみると・・・?

Bashの文字の処理について気になり調べていたところ
Bashの面白い仕様を見つけたので投稿します。
# C=’A’
# echo $((${C}+1));
1
# echo ${C};
A
# echo $((1+1));
2
# C=1
# echo $((${C}+1));
2
#

変数Cに文字Aを代入する
変数Cに1を足し結果を標準出力を行うと1が返る
変数Cを標準出力するとAが返る
数字1に1を足し結果を標準出力を行うと2が返る
変数Cに数字1を代入する
変数Cに1を足し結果を標準出力を行うと2が返る

変数内の文字に対する足し算はエラーを出さず完全に無視するようです。

Perl LWP::UserAgentを使ったHTTPS接続

PerlでLWP::UserAgentを使い、HTTPSサイトへ接続を行いコンテンツを取得してくるプログラムを書く必要が出てきて、色々調べて書いたのですが情報が錯綜していたりで結構ハマったのでソースコードを載せておきます。
今回わけあったりでコンストラクタ側でProxyの情報を保持していなかったりしますが、そこはお好きに改変してお使いください。

#########################################################
#
# LWP::UserAgentを使ったHTTPS接続
#
#########################################################
use utf8;
use strict;
use warnings;

{
    package ProxyWebGet;

    use LWP::UserAgent;

    # コンストラクタ
    sub new {
        my ($class, @args) = @_;
        my %args = ref $args[0] eq 'HASH' ? %{$args[0]} : @args;
        my $self = {%args};

        # オプション項目
        $self->{ac_timeout} ||= 10;    # プロキシ接続時のタイムアウト(秒)

        return bless $self , $class;
    }

    # ホストとポート番号に対してProxy接続を行う
    # 引数にホストとポート番号と接続先URLを指定する
    sub proxy_connect {
        my $self = shift;
        my $proxy_host = shift; # ホストを受け取る
        my $proxy_port = shift; # ポート番号を受け取る
        my $target_url = shift; # 接続先URL

        # ホストとポート番号をLWP::UserAgentで利用できる形式に整形する
        my $http_proxy = 'http://' . $proxy_host . ':' . $proxy_port;

        $ENV{PERL_NET_HTTPS_SSL_SOCKET_CLASS} = 'Net::SSL';
        $ENV{PERL_LWP_SSL_VERIFY_HOSTNAME}    = 0;
        $ENV{HTTPS_PROXY}   = $http_proxy;
        $ENV{HTTPS_VERSION} = 3;

        # LWP::UserAgentのインスタンスの生成
        my $ua = LWP::UserAgent->new(
            timeout => $self->{ac_timeout} # オプションにタイムアウト時間を指定
        );

        # ヘッダーにUTF-8を含む場合エラーが出るため解析しない
        $ua->parse_head(0);

        # 整形したProxyを指定
        $ua->proxy(['http'], $http_proxy);

        # 指定されたURLへ接続する
        # FTP等のプロトコルに接続を行った場合
        # コネクションが維持されるため強制的に破棄する
        my $res = "";
        eval{
            local $SIG{ALRM} = sub{die "timeout"};
            alarm($self->{ac_timeout});   # タイマー設定
            $res = $ua->get($target_url); # URLへ接続しコンテンツを取得
            alarm(0);                     # タイマー解除
        };

        # ステータスコードが正常である場合、コンテンツを返す
        my $result = $res->is_success() ? $res->content() : "";

        return $result;
    }
}

{
    # sub main
    my $pwg = ProxyWebGet->new();

    print $pwg->proxy_connect(
              '000.000.000.000',
              '0000',
              'https://ja.wikipedia.org/wiki/'
          );
}

Linux ファイル・ディレクトリ作成時のデフォルトパーミッションを一般ユーザ権限で設定する

学校やレンタルサーバなどではセキュリティーを意識してかデフォルトパーミッションが600や700に設定されていたりする場合がある。非常に良い設定であると思うが、普段からサーバを触る機会の多い自分からすれば普通にファイルを作成すれば他のユーザから閲覧される可能性があるのは百も承知な訳で煩わしいだけである。そのためこちら側でデフォルトパーミッションを変更したいと思う。

変更自体は簡単で”~/.bash_profile”の中に”umask 022″を追記すればファイルは644・ディレクトリは755で作成される。

面倒な場合やコマンドが叩ける環境であるならば下記のコマンドを実行すればよい。
$ echo “umask 022” >> ~/.bash_profile