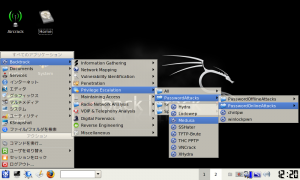
Medusaはネット上のサービスの認証を攻撃するソフトです。
今回SSHのアタックに対する耐久性を調べる為に実際にこのツールを解説します。
起動方法は下記の画像を参考にしてください。

実際にこのツールを使いSSHへの攻撃を行おうとするとバージョンの問題で
途中で止まってしまいます。
まずはアップグレードさせましょう。
アップデートはコマンドで細かく解説しながらやって行っていきます。
今回は再起動してもインストールした内容が消えないように対策します。
※今回の作業はBackTrack 3をインストールしたUSBで行っています。
※今回使用したBackTrack 3は日本語化されております。
ファイルのダウンロードを行う
bt ~ # wget http://www.foofus.net/jmk/tools/medusa-1.5_rc1.tar.gz
–12:35:15– http://www.foofus.net/jmk/tools/medusa-1.5_rc1.tar.gz
=> `medusa-1.5_rc1.tar.gz’
Resolving www.foofus.net… 64.73.32.134
Connecting to www.foofus.net|64.73.32.134|:80… connected.
HTTP request sent, awaiting response… 200 OK
Length: 344,830 (337K) [application/x-gzip]
100%[====================================>] 344,830 139.40K/s
12:35:19 (139.07 KB/s) – `medusa-1.5_rc1.tar.gz’ saved [344830/344830]
圧縮されたファイルを展開する
bt ~ # tar xzvf medusa-1.5_rc1.tar.gz
medusa-1.5_rc1/
medusa-1.5_rc1/doc/
medusa-1.5_rc1/doc/medusa.1
medusa-1.5_rc1/doc/medusa-afp.html
medusa-1.5_rc1/doc/medusa-compare.html
medusa-1.5_rc1/doc/medusa-cvs.html
medusa-1.5_rc1/doc/medusa-ftp.html
medusa-1.5_rc1/doc/medusa.html
medusa-1.5_rc1/doc/medusa-http.html
~~~~~省略~~~~~
medusa-1.5_rc1/src/modsrc/telnet.c
medusa-1.5_rc1/src/modsrc/vmauthd.c
medusa-1.5_rc1/src/modsrc/vnc.c
medusa-1.5_rc1/src/modsrc/d3des.c
medusa-1.5_rc1/src/modsrc/web-form.c
medusa-1.5_rc1/src/modsrc/wrapper.c
解凍したディレクトリに移動
bt ~ # cd medusa-1.5_rc1
設定を行わせる
bt medusa-1.5_rc1 # ./configure
checking build system type… i686-pc-linux-gnu
checking host system type… i686-pc-linux-gnu
checking target system type… i686-pc-linux-gnu
checking for a BSD-compatible install… /usr/bin/ginstall -c
checking whether build environment is sane… yes
checking for gawk… gawk
checking whether make sets $(MAKE)… yes
checking for gcc… gcc
~~~~~省略~~~~~
configure: *******************************************************
configure:
checking for strcasestr… yes
configure: creating ./config.status
config.status: creating Makefile
config.status: creating src/Makefile
config.status: creating src/modsrc/Makefile
config.status: creating config.h
config.status: executing depfiles commands
Makeする
bt medusa-1.5_rc1 # make
make all-recursive
make[1]: Entering directory `/root/medusa-1.5_rc1′
Making all in src
make[2]: Entering directory `/root/medusa-1.5_rc1/src’
Making all in modsrc
make[3]: Entering directory `/root/medusa-1.5_rc1/src/modsrc’
if gcc -DHAVE_CONFIG_H -I. -I. -I../.. -I../../src -g -O2 -g -DDEBUG -fPIC -I/usr/local/include -I/usr/local/ssl/include -I/usr/include/subversion-1 -I/usr/local/include/subversion-1 -I/usr/include/postgresql -I/usr/local/include/postgresql -I/usr/include/afpfs-ng -MT cvs.o -MD -MP -MF “.deps/cvs.Tpo” -c -o cvs.o cvs.c;
then mv -f “.deps/cvs.Tpo” “.deps/cvs.Po”; else rm -f “.deps/cvs.Tpo”; exit 1; fi
~~~~~省略~~~~~
gcc -g -O2 -g -DDEBUG -fPIC -I/usr/local/include -I/usr/local/ssl/include -I/usr/include/subversion-1 -I/usr/local/include/subversion-1 -I/usr/include/postgresql -I/usr/local/include/postgresql -I/usr/include/afpfs-ng -L/usr/local/lib -lssl -lcrypto -rdynamic -ldl -o medusa listModules.o medusa.o medusa-net.o medusa-trace.o medusa-utils.o -lcrypto -lpthread
make[3]: Leaving directory `/root/medusa-1.5_rc1/src’
make[2]: Leaving directory `/root/medusa-1.5_rc1/src’
make[2]: Entering directory `/root/medusa-1.5_rc1′
make[2]: Leaving directory `/root/medusa-1.5_rc1′
make[1]: Leaving directory `/root/medusa-1.5_rc1′
圧縮してインストール
bt medusa-1.5_rc1 # checkinstall
checkinstall 1.6.1, Copyright 2002 Felipe Eduardo Sanchez Diaz Duran
This software is released under the GNU GPL.
The package documentation directory ./doc-pak does not exist.
Should I create a default set of package docs? [y]: y
パッケージのドキュメンテーションを準備..OK
Please choose the packaging method you want to use.
Slackwareなら[S], RPMなら[R], Debianなら[D]を入力S
このパッケージの説明を書いてください Remember that pkgtool shows
only the first one when listing packages so make that one descriptive.
End your description with an empty line or EOF.
>>
********************************************
**** Slackware package creation selected ***
********************************************
This package will be built according to these values:
1 – Summary: [ Package created with checkinstall 1.6.1 ]
2 – Name: [ medusa ]
3 – Version: [ 1.5_rc1 ]
4 – Release: [ 1 ]
5 – License: [ GPL ]
6 – Group: [ Applications/System ]
7 – Architecture: [ i386 ]
8 – Source location: [ medusa-1.5_rc1 ]
9 – Alternate source location: [ ]
10 – Requires: [ ]
変更するものの番号を入力してください。Enterで続行します:
Installing with make install…
========================= Installation results ===========================
Making install in src
make[1]: Entering directory `/root/medusa-1.5_rc1/src’
Making install in modsrc
make[2]: Entering directory `/root/medusa-1.5_rc1/src/modsrc’
make[3]: Entering directory `/root/medusa-1.5_rc1/src/modsrc’
make[3]: Nothing to be done for `install-exec-am’.
test -z “/usr/local/lib/medusa/modules” || mkdir -p — “/usr/local/lib/medusa/modules”
/usr/bin/ginstall -c ‘cvs.mod’ ‘/usr/local/lib/medusa/modules/cvs.mod’
/usr/bin/ginstall -c ‘ftp.mod’ ‘/usr/local/lib/medusa/modules/ftp.mod’
/usr/bin/ginstall -c ‘http.mod’ ‘/usr/local/lib/medusa/modules/http.mod’
~~~~~省略~~~~~
**********************************************************************
Done. The new package has been saved to
/root/medusa-1.5_rc1/medusa-1.5_rc1-i386-1.tgz
You can install it in your system anytime using:
installpkg medusa-1.5_rc1-i386-1.tgz
**********************************************************************
圧縮してインストールしたファイルを確認する。
bt medusa-1.5_rc1 # ls
AUTHORS config.status*
COPYING config.sub*
ChangeLog configure*
INSTALL configure.in
Makefile depcomp*
Makefile.am description-pak
Makefile.in doc/
NEWS doc-pak/
README install-sh*
TODO ltmain.sh
aclocal.m4 medusa-1.5_rc1-i386-1.tgz
backup-120620091241-pre-medusa-1.5_rc1.tgz misc/
config.guess* missing*
config.h mkinstalldirs*
config.h.in src/
config.log stamp-h1
rootディレクトリへコピーする。
bt medusa-1.5_rc1 # cp medusa-1.5_rc1-i386-1.tgz /root
rootディレクトリへ移動する。
bt medusa-1.5_rc1 # cd
ファイルが移動されているかを確認
bt ~ # ls
Desktop/ medusa-1.5_rc1/ medusa-1.5_rc1-i386-1.tgz medusa-1.5_rc1.tar.gz
圧縮してインストールされたファイルを展開する。
bt ~ # tar xzvf medusa-1.5_rc1-i386-1.tgz
./
install/
install/slack-desc
install/doinst.sh
usr/
usr/local/
usr/local/share/
usr/local/share/man/
usr/local/share/man/man1/
usr/local/share/man/man1/medusa.1.gz
usr/local/lib/
usr/local/lib/medusa/
usr/local/lib/medusa/modules/
~~~~~省略~~~~~
usr/doc/medusa/doc/medusa-ftp.html
usr/doc/medusa/doc/medusa-cvs.html
usr/doc/medusa/doc/medusa-compare.html
usr/doc/medusa/doc/medusa-afp.html
usr/doc/medusa/doc/medusa.1
USBメモリがマウントされているディレクトリを探す。
bt ~ # ls /mnt
floppy/ hdc1/ live/ sda1/ sda2/
ディレクトリ/mnt/sda1/BT3/toolsへ移動する。
bt ~ # cd /mnt/sda1/BT3/tools
newディレクトリを作成する。
bt tools # mkdir new
作成されたか確認する。
bt tools # ls
WIN/ dir2lzm* lzm2dir* new/ tgz2lzm* uselivemod*
先ほど展開したmedusa-1.5_rc1-i386-1.tgzの中身usrディレクトリを移動する。
bt tools # mv /root/usr ./new/
移動されたか確認する。
bt tools # ls new
usr/
モジュールにする為.lzmへ圧縮しなおす。
bt tools # dir2lzm new medusa-1.5_rc1-i386-1.lzm
—
Warning, if possible, uncompress these archives in your module:
./new/usr/local/share/man/man1/medusa.1.gz
[==================================================================] 60/60 100%
done OK
圧縮されたか確認する。
bt tools # ls
WIN/ liblinuxlive* mksquashfs* tgz2lzm*
deb2lzm* lzm2dir* new/ unsquashfs*
dir2lzm* medusa-1.5_rc1-i386-1.lzm rmlivemod* uselivemod*
再起動時に自動的に読み込まれるようにmodulesディレクトリへ移動させる。
bt tools # mv medusa-1.5_rc1-i386-1.lzm ../modules/
再起動させる。
bt tools # reboot
Medusaを起動して最初に
Medusa v1.5_rc1・・・・・・・
と表示されたらインストール成功です。
実際に192.168.24.10のSSHへ辞書攻撃を行う
bt ~ # medusa -f -h 192.168.24.10 -u root -P /usr/local/john-1.7.2/password.lst -M ssh
※当サーバはSSHへの攻撃対策を十分に行っております。
※又、他人のサーバへの攻撃は迷惑になるのでやめましょう。


最近のコメント